
 JustryDeng
64e6b8dda7
lib包替换
JustryDeng
64e6b8dda7
lib包替换
|
2 ani în urmă | |
|---|---|---|
| class-winter-core | 2 ani în urmă | |
| class-winter-maven-plugin | 2 ani în urmă | |
| file | 3 ani în urmă | |
| .gitignore | 3 ani în urmă | |
| LICENSE | 5 ani în urmă | |
| README.md | 2 ani în urmă | |
| java | 5 ani în urmă | |
| pom.xml | 2 ani în urmă |
README.md
代码混淆之class-winter
仓库最新版本
<img alt="maven" src="https://img.shields.io/maven-central/v/com.idea-aedi/class-winter-maven-plugin?style=flat-square">
郑重声明
class-winter 是本人在学习完 class-final(v1.1.9) 后,仿照class-final进行编写的,部分思路与class-final一致
环境要求
- 支持jdk8语法的环境即可
本人构建class-winter时,用的jdk版本为:
1.8.0_281
注:tomcat版本不能低于8(部分小版本低的tomcat8可能也不行),否则可能报错
org.apache.catalina.LifecycleException: Failed to start component [StandardEngine[Catalina].StandardHost...
注:如果有兼容低版本jdk的需求,可以自己下载master分支代码,进行对应修改
功能与特性
- 支持war(普通war+可执行war)加密
- 支持jar(普通jar+可执行jar)加密
- 支持xml加密(掩耳盗铃版)
加密
方式一:通过maven插件自动加密
<!--
  class-winter插件``
  注:自Maven3.0.3起, 绑定到同一phase的Maven插件将按照pom.xml中声明的顺序执行
  注:此插件最好放置在同一phase的最后执行。
  注:此插件不具备打包功能,需要在此插件前有打包插件进行项目打包,否则加密不会生效。
-->
<plugin>
  <groupId>com.idea-aedi</groupId>
  <artifactId>class-winter-maven-plugin</artifactId>
  <version>enhance-2.9.5</version>
  <!-- 相关配置 -->
  <configuration>
      <!-- <finalName></finalName>-->
      <includePrefix>加密范围</includePrefix>
      <!-- <originJarOrWar>非必填(不填则自动获取)</originJarOrWar>-->
      <!-- <excludePrefix></excludePrefix>-->
      <!-- <includeXmlPrefix></includeXmlPrefix>-->
      <!-- <excludeXmlPrefix></excludeXmlPrefix>-->
      <!-- <toCleanXmlChildElementName></toCleanXmlChildElementName>-->
      <!-- <password></password>-->
      <!-- <includeLibs></includeLibs>-->
      <!-- <alreadyProtectedRootDir></alreadyProtectedRootDir>-->
      <!-- <alreadyProtectedLibs></alreadyProtectedLibs>-->
      <!-- <supportFile></supportFile>-->
      <!-- <jvmArgCheck></jvmArgCheck>-->
      <!-- <tips></tips>-->
      <!-- <debug></debug>-->
  </configuration>
  <executions>
      <execution>
          <phase>package</phase>
          <goals>
              <goal>class-winter</goal>
          </goals>
      </execution>
  </executions>
</plugin>
注:不必担心信息泄漏问题,使用此方式生成混淆的jar包时,会擦除pom.xml中关于class-winter-plugin的信息。
方式二:通过 class-winter-core.jar 主动加密
java -jar class-winter-core-enhance-2.9.5.jar originJarOrWar=${要加密的项目.jar或.war包} includePrefix=${加密范围} [k3=v3 k4=v4 ...]
# 对于复杂的参数值,可以使用引号引起来
# linux
java -jar class-winter-core-enhance-2.9.5.jar k1='v1' k2='v2'
# windows
java -jar class-winter-core-enhance-2.9.5.jar k1="v1" k2="v2"
加密参数
提示:慎用
cca(尤其)、cma、cfa参数,如果要用,请做好充分测试。原因说明:部分框架在获取某些元数据时,并不全都从已被premain处理后的类中读取,而是直接去对应位置读取资源文件本身(如:spring的
SimpleMetadataReader implements MetadataReader直接去读取.class文件本身,以知道是否需要将类注册进容器等),因为class-winter会对该位置的资源进行加密(如:使用cca、cma、cfa时会擦除类、方法、字段上的注解信息),因此此时如果直接去.class文件本身获取元信息的话,可能会丢失部分信息(如:被class-winter擦除了的类的注解信息就读取不到)解决办法:可以考虑对相关逻辑进行定制,使其不从已加密的.class中获取相关信息(如:spring框架可考虑定制MetadataReader)
| 参数 | 是否必填 | 说明 | 示例 |
| originJarOrWar | 是 | 指定要加密的jar/war文件
注:当使用maven插件进行自动加密时,此参数非必填,不填则自动获取。 注:当使用maven插件进行自动加密时,可结合maven相关占位符进行相对定位。如:${project.basedir}/../../your-project.jar |
originJarOrWar=/my-project.jar |
| includePrefix | 是 | 通过前缀匹配的形式定位要加密的class,支持正则匹配
注:多个通过逗号分割。 |
includePrefix=com
includePrefix=com,org includePrefix=com.*.dao,org |
| cca(依托于includePrefix) | 否 | 作为includePrefix的附加设置,设置是否清空类上的注解(写法同url后面设置参数) | includePrefix=com?cca=true |
| cma(依托于includePrefix) | 否 | 作为includePrefix的附加设置,设置是否清空方法上的注解(写法同url后面设置参数) | includePrefix=com?cca=true&cma=true |
| cfa(依托于includePrefix) | 否 | 作为includePrefix的附加设置,设置是否清空字段上的注解(写法同url后面设置参数) | includePrefix=com?cca=true&cma=true&cfa=true |
| caPrefix(依托于cca、cma、cfa开关) | 否 | 作为includePrefi``x的附加设置,依托于cca、cma、cfa开关,清空类、方法、字段上的指定注解(写法同url后面设置参数)
注:多个通过|分割,注解请写完全路径例如:com.xx.anno.MyAnnotation |
includePrefix=com?cca=true&cma=true&cfa=true&caPrefix=com.xx.anno.MyAnnotation|com.bb.anno.MyAnnotation |
| excludePrefix | 否 | 通过前缀匹配的形式排除class,不对其加密,支持正则匹配
注:多个通过逗号分割。 注:excludePrefix优先级高于includePrefix。 |
excludePrefix=com.example.service,com.example.util.*.class |
注:多个通过逗号分割。
注:如果您打出来的加密包是准备作为一个lib包提供给第三方使用的,那么请不要使用此参数,因为解密时是不会解密项目所依赖的lib包中的xml的。
includeXmlPrefix=BOOT-INF/classes/com/demo/mapper/,BOOT-INF/classes/com/*/dao/
注:多个通过逗号分割。
excludeXmlPrefix=BOOT-INF/classes/com/demo/mapper/,BOOT-INF/classes/com/demo/*/UserDao.xml
注:默认值为resultMap,sql,insert,update,delete,select
注:多个通过逗号分割。
注:若finalName与加密的包一致,那么生成的加密后的包会覆盖原来的包。
注:支持相对路径。 比如:../../tmp/my-project 就会在相对目录../../tmp下生成加密包my-project.jar。
注:密码不能包含空格和逗号。
注:多个通过逗号分割。
注:lib中的class是否会被加密,还得由includePrefix和excludePrefix决定。
注:当指定此参数时,也会优先去jar/war内部找对应的lib包,找不到时,才会去此参数指定的根目录下找lib包。
注:在一些外置lib的项目中,可能需要用到此参数;如果是内置lib,忽略此参数即可。
注:此参数由2.7.0版本开始支持
注:多个通过逗号分割。
注:主要用于处理第三方提供的由class-winter加密了的依赖包的场景。
注:若lib需要密码,那么需要在指定lib的同时通过冒号接上密码。
注:如果lib有密码,那么密码不能包含逗号。
alreadyProtectedLibs=a.jar,b-1.0.0.jar:pwd123
alreadyProtectedLibs=a.jar:pwd1,b-1.0.0.jar:pwd2
注:当为目录时,该目录(含子孙目录)下的所有jar都会被采集作为辅助文件。
注:主要用于解决因ClassNotFound导致的加密失败问题。
supportFile=/libs
注:多个通过逗号分割。
注:大小写不敏感。
如:通过设置-XX:+DisableAttachMechanism防止运行时dump class,以提高安全性。
注:当直接使用加密后的jar/war时,用到了加密了的类后,会先System.err.println输出此tips,然后System.exit退出程序。
linux示例:tips='请不要直接使用混淆后的jar/war'
解密(启动)
class-winter支持JVM参数校验,通过在JVM参数中加入-XX:+DisableAttachMechanism来防止其他工具连接到你的Java程序。这样可以阻止运行至dump class。但是有些高级开发者可能会想要使用
sa-jdi的HSDB来dump字节码。从enhance-2.8.8版本开始,支持在启动Java解密时禁用了gHotSpotVMStructs函数,避免使用sa-jdi HSDB 来dump class,提高代码安全性。
jar解密(启动)
# 假设your-project-encrypted.jar是由class-winter加密后的包,那么你可以这么启动
java -javaagent:/your-project-encrypted.jar -jar /your-project-encrypted.jar
# 也可以用class-winter-core-enhance-2.9.5.jar
# java -javaagent:/class-winter-core-enhance-2.9.5.jar -jar /your-project-encrypted.jar
# 或者指定参数
# java -javaagent:/your-project-encrypted.jar=debug=true,password=pwd12345 -jar /your-project-encrypted.jar
# 参数可以引起来(linux)
# java -javaagent:/your-project-encrypted.jar='debug=true,password=pwd12345' -jar /your-project-encrypted.jar
# 参数可以引起来(windows)
# java -javaagent:/your-project-encrypted.jar="debug=true,password=pwd12345" -jar /your-project-encrypted.jar
war解密(启动)
以Tomcat9为例
- linux方式一
编辑tomcat/bin/catalina.sh文件,在最上面加上
# 如果你有参数, 那么 -javaagent:/class-winter-core-enhance-2.9.5.jar=k1=v1,k2=v2 # tomcat启动往往需要通过decryptProjectPathPrefix指定要解密的路径 CATALINA_OPTS="$CATALINA_OPTS -javaagent:/class-winter-core-enhance-2.9.5.jar=debug=true,decryptProjectPathPrefix=/usr/local/xxx/"; export CATALINA_OPTS;- linux方式二
在tomcat/bin目录下创建setenv.sh文件,并写上
# 如果你有参数, 那么 -javaagent:/class-winter-core-enhance-2.9.5.jar=k1=v1,k2=v2 # tomcat启动往往需要通过decryptProjectPathPrefix指定要解密的路径 JAVA_OPTS="$JAVA_OPTS -javaagent:/class-winter-core-enhance-2.9.5.jar=debug=true,decryptProjectPathPrefix=/usr/local/xxx/"; export JAVA_OPTS;- windows方式一
编辑tomcat/bin/catalina.bat文件,在@echo off后加上catalina参数
rem 如果你有参数, 那么 -javaagent:D:/class-winter-core-enhance-2.9.5.jar=k1=v1,k2=v2 rem tomcat启动往往需要通过decryptProjectPathPrefix指定要解密的路径 set CATALINA_OPTS="-javaagent:D:/class-winter-core-enhance-2.9.5.jar=decryptProjectPathPrefix=/D:/tmp/"- windows方式二
在tomcat/bin目录下创建setenv.bat文件,并写上
rem 如果你有参数, 那么 -javaagent:D:/class-winter-core-enhance-2.9.5.jar=k1=v1,k2=v2
rem tomcat启动往往需要通过decryptProjectPathPrefix指定要解密的路径
set JAVA_OPTS="-javaagent:D:/class-winter-core-enhance-2.9.5.jar=decryptProjectPathPrefix=/D:/tmp/"
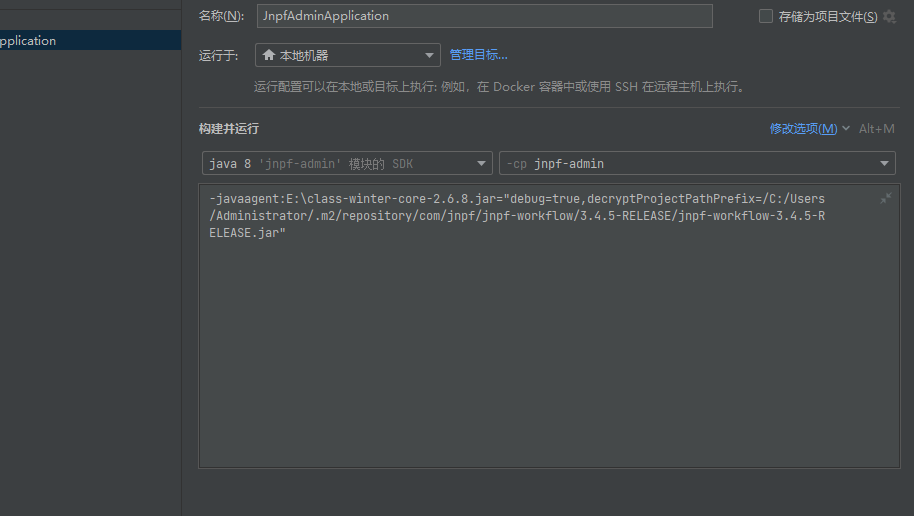
IDE解密(启动)
设置
-javaagent参数指定class-winter-core或者任一加密包。有必要的话,再搭配skipProjectPathPrefix或者decryptProjectPathPrefix参数启动即可
解密参数
| 参数 | 是否必填 | 说明 | 示例 |
| password | 否 | 指定解密密码 | password=pwd123 |
| passwordFromFile | 否 | 从指定文件中读取文本作为解密密码 注:此参数由2.4.0版本开始支持 |
passwordFromFile=/my-pwd-file.txt |
| passwordFromShell | 否 | 执行shell文件中的代码,并以其返回值作为解密密码 注:此参数由2.4.0版本开始支持 |
passwordFromShell=/my-pwd-file.shell |
| skipProjectPathPrefix | 否 | 是否跳过指定前缀的项目路径(当class-winter解密逻辑试图解析那些进入premain但是非class-winter加密项目时,会因为获取印章失败Obtain project seal fail而停止,此时如果确认这个项目没有加密文件的话,可以使用此参数跳过) 注:值中的路径分隔符请统一使用/ 注:不知道此值怎么填的,可以把debug代开, 观察日志 Exist projectPath -> xxx,从输出的所有projectPath中找到加密包的路径 注:此参数由2.6.4版本开始支持 |
skipProjectPathPrefix=/D:/apache-tomcat-9.0.71/bin/
多个通过___符号拼接:skipProjectPathPrefix=/D:/apache-tomcat-9.0.71/bin/___/D:/jd/classpath/lib/ |
注:值中的路径分隔符请统一使用/
注:不知道此值怎么填的,可以把debug代开, 观察日志 Exist projectPath -> xxx,从输出的所有projectPath中找到加密包的路径
注:此参数由2.6.6版本开始支持
多个通过___符号拼接:decryptProjectPathPrefix=/D:/apache-tomcat-9.0.71/bin/___/D:/jd/classpath/lib/
对class-winter本身进行加密
感谢小伙伴Mango对class-winter的优质反馈
- 背景说明:我们利用class-winter混淆项目时,项目是被混淆了,但是class-winter本身还是明文的,这就留下了一些安全隐患(即:那些不指定密码的混淆,可能会被反向破解)
- 增强支持:我们可以对class-winter本身进行加密,你可以切换至
enhance-*分支,在首页下载被混淆的class-winter进行测试,或者clone代码,install后进行测试 - 声明:因为在
enhance-*分支里对class-winter本身进行加密时用到了收费工具allatori(实际上有供学习使用的破解版之类的),所以enhance-*分支的代码,本人并未发布至maven官方仓库
将已加密的包提供给客户使用
方案
- 方案一(适用于encrypted-A依赖于encrypted-B.jar,启动encrypted-A的情况)
提示:此方式也适用于不加密A的情况,在A里的class-winter配置你只需要指定一个不存在的includePrefix即可
class-winter加密时,使用alreadyProtectedLibs参数,但是要求客户的项目也需要使用class-winter加密(,哪怕客户的项目什么也不需要加密,也要求客户有使用class-winter这个动作)
- 方案二(适用于A依赖于encrypted-B.jar,启动A的情况)
利用-Dloader.path或其它方案,将encrypted-B.jar外置,并通过decryptProjectPathPrefix或skipProjectPathPrefix来定位encrypted-B.jar
示例
提示:这里以可执行的jar进行的示例,其余的外置方式也是可以的(如:tomcat部署war包解压后,lib包就相当于是外置的)
以-Dloader.path实现,将encrypted-B.jar外置到项目包A外
- 假设客户依赖了我们的加密包
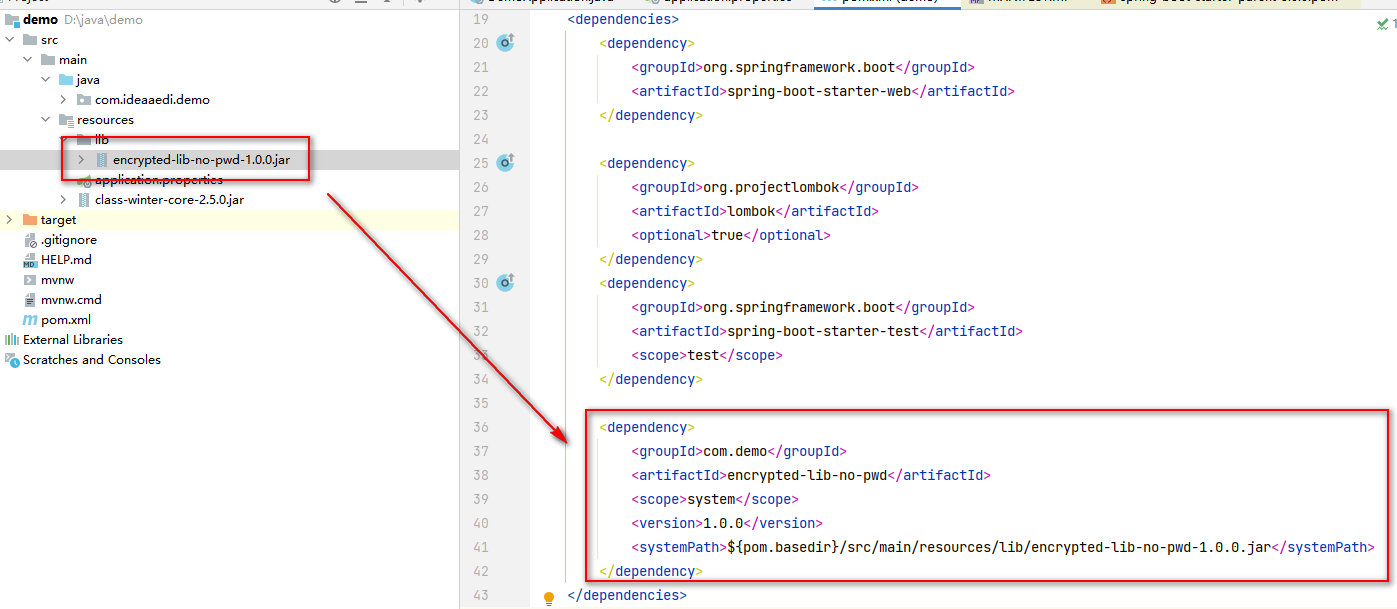
- 客户使用maven插件,打包时将项目代码和依赖的lib分开
完整pom示例:
  <?xml version="1.0" encoding="UTF-8"?>
  <project xmlns="http://maven.apache.org/POM/4.0.0" xmlns:xsi="http://www.w3.org/2001/XMLSchema-instance"
           xsi:schemaLocation="http://maven.apache.org/POM/4.0.0 https://maven.apache.org/xsd/maven-4.0.0.xsd">
      <modelVersion>4.0.0</modelVersion>
      <parent>
          <groupId>org.springframework.boot</groupId>
          <artifactId>spring-boot-starter-parent</artifactId>
          <version>2.6.4</version>
          <relativePath/> <!-- lookup parent from repository -->
      </parent>
      <groupId>com.example</groupId>
      <artifactId>demo</artifactId>
      <version>0.0.1-SNAPSHOT</version>
      <name>demo</name>
      <description>Demo project for Spring Boot</description>
      <properties>
          <java.version>1.8</java.version>
      </properties>
      <dependencies>
          <dependency>
              <groupId>org.springframework.boot</groupId>
              <artifactId>spring-boot-starter-web</artifactId>
          </dependency>

          <dependency>
              <groupId>org.projectlombok</groupId>
              <artifactId>lombok</artifactId>
              <optional>true</optional>
          </dependency>
          <dependency>
              <groupId>org.springframework.boot</groupId>
              <artifactId>spring-boot-starter-test</artifactId>
              <scope>test</scope>
          </dependency>

          <dependency>
              <groupId>com.demo</groupId>
              <artifactId>encrypted-lib-no-pwd</artifactId>
              <scope>system</scope>
              <version>1.0.0</version>
              <systemPath>${pom.basedir}/src/main/resources/lib/encrypted-lib-no-pwd-1.0.0.jar</systemPath>
          </dependency>
      </dependencies>

      <build>
          <plugins>
              <plugin>
                  <groupId>org.springframework.boot</groupId>
                  <artifactId>spring-boot-maven-plugin</artifactId>
                  <configuration>
                      <!-- 指定该Main Class为全局的唯一入口 -->
                      <mainClass>com.ideaaedi.demo.DemoApplication</mainClass>
                      <!-- 把systemPath指定的jar包也纳入lib -->
                      <includeSystemScope>true</includeSystemScope>
                      <fork>true</fork>
                      <!-- 设置为ZIP,此模式下spring-boot-maven-plugin会将MANIFEST.MF文件中的Main-Class设置为org.springframework.boot.loader.PropertiesLauncher -->
                      <layout>ZIP</layout>
                      <includes>
                          <include>
                              <groupId>nothing</groupId>
                              <artifactId>nothing</artifactId>
                          </include>
                      </includes>
                  </configuration>
                  <executions>
                      <execution>
                          <goals>
                              <goal>repackage</goal>
                          </goals>
                      </execution>
                  </executions>
              </plugin>

              <!-- 通过插件将所有依赖的lib包放到编译后的target/lib目录,并且在打包时候排除内部依赖 -->
              <plugin>
                  <groupId>org.apache.maven.plugins</groupId>
                  <artifactId>maven-dependency-plugin</artifactId>
                  <version>3.2.0</version>
                  <executions>
                      <execution>
                          <id>copy-dependencies</id>
                          <phase>prepare-package</phase>
                          <goals>
                              <goal>copy-dependencies</goal>
                          </goals>
                          <configuration>
                              <outputDirectory>${project.build.directory}/lib</outputDirectory>
                              <overWriteReleases>false</overWriteReleases>
                              <overWriteSnapshots>false</overWriteSnapshots>
                              <overWriteIfNewer>true</overWriteIfNewer>
                              <includeScope>compile</includeScope>
                          </configuration>
                      </execution>
                  </executions>
              </plugin>
          </plugins>
      </build>

  </project>
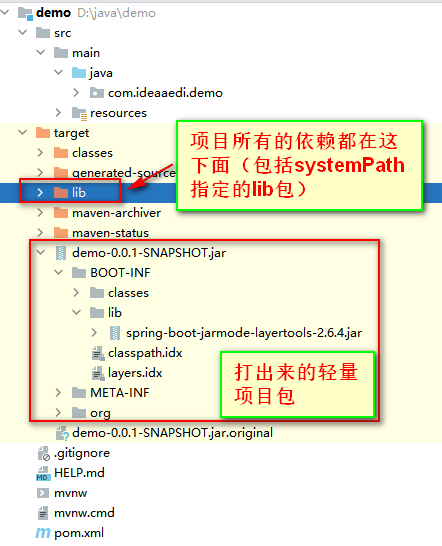
打出来的包:
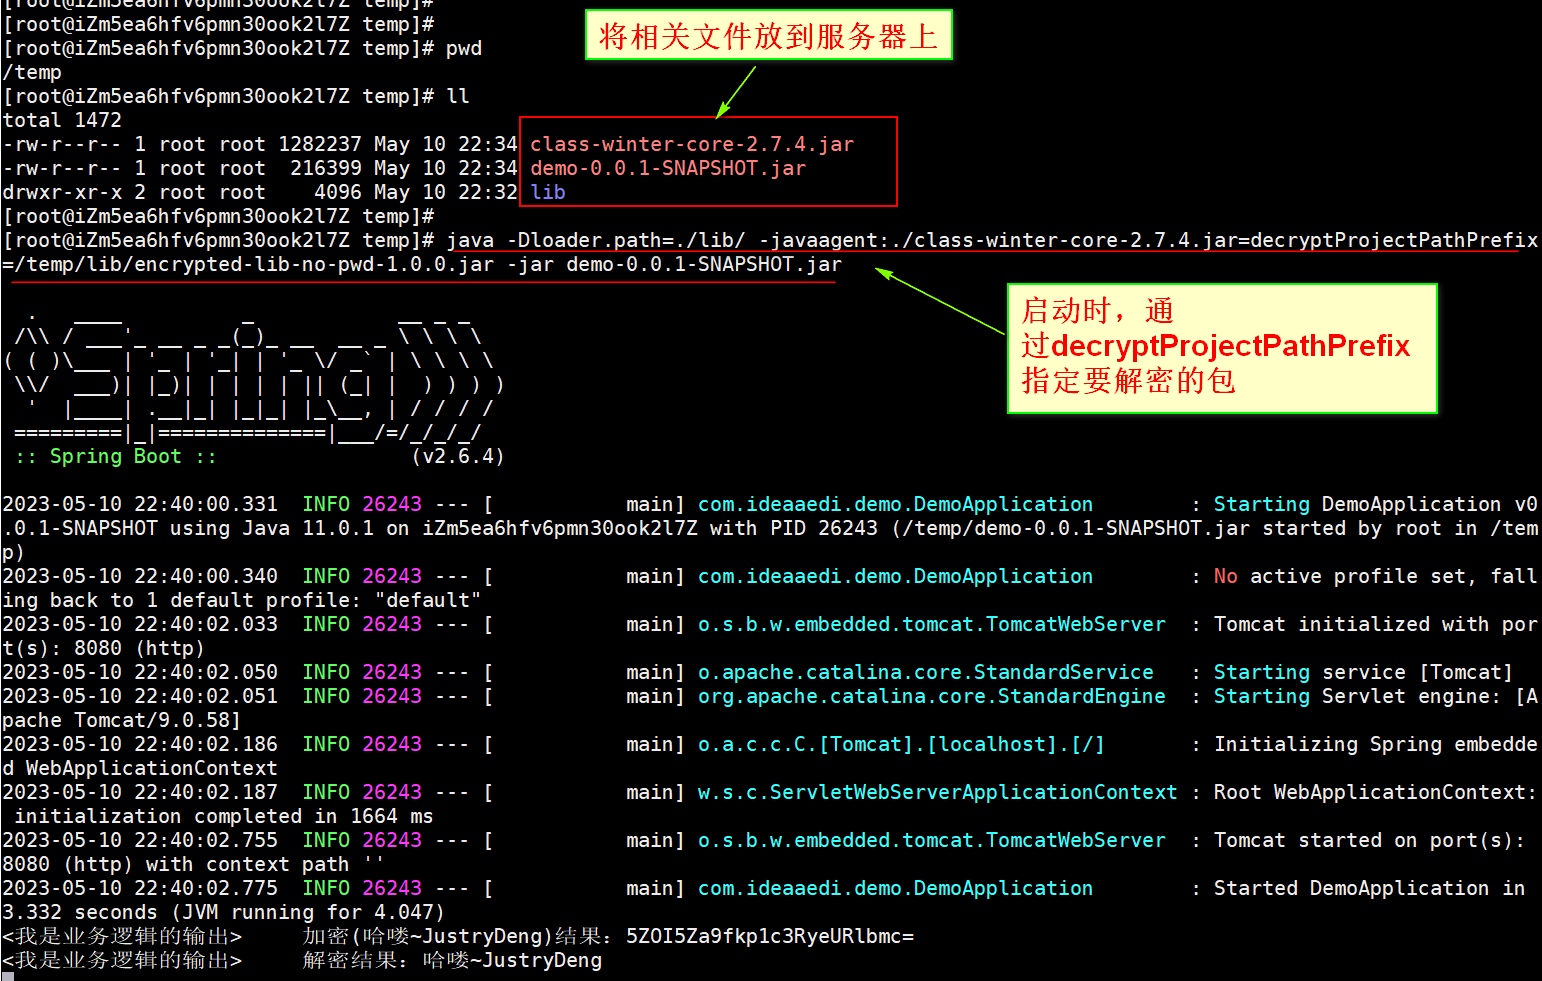
- 客户可以这样启动项目
java -Dloader.path=./lib/ -javaagent:./{class-winter.jar} -jar {客户项目.jar}
功能扩展案例
感谢以下小伙伴们的优秀扩展案例
| 序号 | 扩展功能 | 作者 | 仓库地址 |
|---|---|---|---|
| 1 | 机器码支持 | qq号:85546017当前(2023-06-11)状态: qq名: ╮(╯_╰)╭是否在class-winter QQ群:是 |
点击跳转 |
| ...... | ...... | ...... | ...... |
QQ群
群号:727930548